Building Tips for Beginners (and maybe a couple for pros) by J T Masters:
These are not necessarily in order, but I have learned these from my experiences building FG models as well as plastic and balsa kits. The other FG tips and tricks on the website are excellent, so these are just supplemental.
I am by no means an expert, but I have been surprised at how nice I can get a paper model to look (you will be, too). Being a neophyte, I am probably unaware of most of the true secrets of building professional card models, but these techniques work for me ... most of the time.
 |

ALWAYS remember this. Using heavyweight cardstock and an ordinary color inkjet printer works extremely well. I have access to two color laser printers at work, but the colors seem more vivid and bold on the inkjet. The new inkjet inks really don't run or smear when slightly wetted. If you goober up a part, you can simply print another.
Getting a model to look good is tedious work; be patient. Choose your favorite plane that you would like to eventually build. Set that as your goal. My first goal was the Fokker D7. I figured bi-planes were more tricky, so I didn't just jump right in. Build a couple of monoplanes first (they're easiest) to get acquainted with the medium. Then move on to more challenging bi-planes and multi-engine planes (if you want to). I started with the Aeronca Champ (I had just helped restore a real one) and then built a Pietenpol (I'm also building the real thing).
 |
Jason, my son, has done a real cute thing here. You see the Whitehead 1899 Flying Machine flying over and checking out the Wright Flyer as it prepares for it's historic first flight at Kitty Hawk. |
Just jump right into your favorite plane and have fun.
Study photos of the real aircraft, and even visit a local, small airport in search of the real thing. Visit some of the aircraft repair places and if you ask nicely they'll probably let you look around and take photos. Watch out for control surfaces on Cessnas - - Ouch! The Air Force Museum website has dozens of great military aircraft photos.
Once parts are folded and glued, you'll end up with white edges. Buy a set of colored felt tipped pens for touch up. Sometimes the white edges look good on leading, wear-prone edges, but the trailing edges really benefit from this touch-up. A set of craft paints works even better because it will cover dried glue. You also need to touch-up cut edges.
Elmer's glue works fine, and is very strong. After you initial glue bond has dried, go back and apply reinforcing gussets to the joints for strength. Not all joints need this, but wing struts and landing gear struts benefit greatly, especially if you want it to survive the irresistible toss onto the bed. Stop by your local hobby store and pick up a small bottle of Cyano-Acrylate adhesive (CA). The thicker, medium-drying kind seems to work best. This glue cures in about 8 or 9 seconds and is perfect for tricky parts that make you wish you had three hands. Not much time for repositioning parts, though, so be sure about placement first. Most CA joints benefit from a small point of reinforcing Elmer's after the CA has dried. CA works nicely on struts.
 An excellent tool for scoring folds is a dull hobby knife. I ran the edge across a sharpening stone several times to get it nice and dull. It makes a beautifully precise scoring instrument. Use a sharp hobby knife for your tricky, tight angles, and use a small pair of sharp, precise scissors for the others. The profile drawings that come with the instructions are valuable. Tack them up in plane sight. For added realism in open-cockpit models, estimate how much of the inside will be visible through the cockpit opening and color the inside surface dark. Don't get too thick with the paint or too bold with the marker or the fuselage will warp. Of course you must do this before the fuselage is assembled, as I forgot
on my latest Fokker.
An excellent way to get wings exactly perpendicular to the fuselage: Using a straightedge, make a large cross with heavy black lines. Make the cross as perfect as you can. Tack this on the opposing wall about 6-8 feet in front of you. Place the wings in the fuselage without glue and hold the plane at arms length over the center of the cross. Line up the center of the fuselage with the vertical line and adjust the wings until they match the horizontal line. You'll get it perfect every time. Because of the distance between your eyes, the plane at the end of your arm, and the cross on the wall, it's easier to get things precise as opposed to using a closer reference on your desk. This principle is what makes the sights on  a rifle easier to line up than the sights on a pistol.
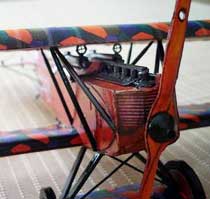
For planes with exposed guns, such as WWl models, forego the printed patterns and make them out of round toothpicks and square wooden matchsticks. It's a lot of work, but it adds tremendously to the realism. This may or may not work for you, depending on the size at which you printed your model.
Assembly order for bi-planes (as well as many others). Fuselage and nose section; wings; tail section; landing gear; propeller. This keeps you from damaging the fragile stuff. If the plane has a separate cowl and radial or rotary engine, attach these last.
Here's a good technique for building bi-plane wings:
Once the lower wing is glued to the fuselage, cut two soft foam blocks to the exact height that you want the top wing to be. Lay them on top of the bottom wing (one on each side of fuselage) and secure with a few wraps of string. Now lay the top wing to complete the "sandwich. Secure this with a few more wraps of string. Now you have a solid, stable unit with which to work. Cutting your outside wing struts to the exact-right length is now easy. Now glue these outside struts in place. You can use the CA for a quick bond. Once the glue has dried, cut away the string and carefully compress the foam blocks to remove them from between the wings. Now you can focus on the cabanes (the struts that connect the fuselage to the top wing). For them it's almost always best to start from scratch with flat toothpicks.
Bi-plane landing gear.
The most tricky part of all (to me). Forming the small airfoil of the landing plane symmetrically is essential. If you don't, you'll spend a lot of time cutting the gear struts to custom lengths to compensate.
One method:
Make axle plane. Pre-fit everything as accurately as possible. Cut out the axle openings and get the axle (toothpick) and wheels all figured out,  but don't attach them yet. Take the plunge and glue the struts to the axle plane (without wheels), working your best to get the angles correct. Use CA here because of its quick dry time, or gooey Elmer's. Now make a little foam block to support the tail section at the correct attitude and place the gear assembly under the front at the locating marks. Sight the plane straight on as well as from the side and see if everything is lined-up right. Refer to the profile drawings of the plane. If the length of the gear struts (or maybe just one of them) needs trimming, remove the assembly and carefully make the adjustments with your hobby knife or a carefully-operated fingernail file. Be very careful while making these corrections, or you'll have to start the gear all over. Now use Elmer' s glue (because it gives you repositioning time) on top of the gear strut's and place them back under the plane. Once it's good and dry, congratulate yourself.
Use O-rings for tires.
I tried Cheerios on the Aeronca, but a small colony of ants tried to carry the plane away. It takes some work, but here is how I do it:
Buy an assorted pack of plumbing or automotive o-rings and find the size that matches the tire on the printed design. Cut out a cardboard disk for the wheel. It is difficult to trace a perfect circle of the right size without help. This will sound a bit rednecky but heck; I am an Arkansas redneck! Using my collection of brass shell-casings, I find one that the o-ring will just slip over. I then trace around that shell onto the cardboard for a perfect-fitting wheel for my o-ring tire. For you non-rednecks, find a friend who hunts and  ask for some of the spent casings. Even going to the local gun shop might score you a few.
Finally, don't be afraid to fly your finished model around the house, making machine gun noises Don't be afraid to do this for longer than you think you should. Cats make good strafing targets as long as you stay above the anti-aircraft claws. My cat is terrified at the sight of Ernst Udet's triplane bearing down on him.
And
yes, a good wife eventually gives up telling you it's silly.