

Assay-Land Office - $$2.50
When a prospector was lucky enough to come across some signs of gold, he'd run his ore over to the Assay Office to determine just how much gold he was looking at.

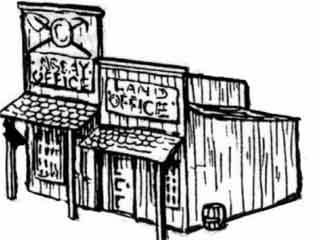
The little Assay and Land Office
 When a prospector was lucky enough to come across some signs of gold, he'd run his ore over to the Assay Office to determine just how much gold he was looking at.
The Land Office was the early western version of the Real Estate office.
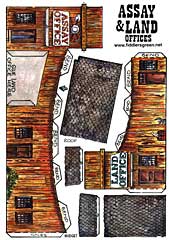
Jay Massey builds and talks about, the Fiddlersgreen Assay and Land Office from the Western Boomtown Collection:
Here is the gist of the build up that I followed for this one.
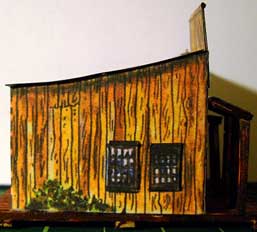
When I started cutting it out a few things jumped out at me. The two cats on the side of the Land Office was another touch that caught my eye. One of them sitting on what appeared to be either a barrel or a box, I knew that it was something that I could add. When I started cutting out the Assay Office, the front doors being ajar also caught my eye. I knew that I wanted to add an interior since the open doors were just begging for that. The two buildings also had porch extensions that were just flaps sticking out from the front of each. Having seen wa-ay too many westerns as a kid growing up, I knew that these would have had a set of posts holding these up. The work that I had done on the Western Rail Road Station also clued me in as to how hard it was to keep this little bit of detail from leaning this way and that as the glue set so I also decided to set the pair of them onto a wooden platform as a way of getting around that problem. It also served as a way of having a base for these two to sit on once I got further into building them.
I started my project by making a trio of print outs with which to work. This was done to provide ample material to work with to create my interior for the Assay Office. I clipped out the parts that I knew would be required first. When I cut the main building parts out, I also cut out the back doors of each so that I could do the 3D bit that I had done to the previous Rail Road Station. I also clipped out the windows from the second printout so that I could layer them on the walls of the buildings to make them stand out a bit. The two signs on the fronts were also clipped out along with the little shovel, pick, and gold pan from the top of the Assay Office. for the same reasons. I also cut out the front door from the second printout so I could add it to the front of the Land Office. When I was cutting that out, I noticed what appeared to my eye to be a small sort of hanging open topped bin, I suppose it was to put mail or papers in when the office was not open.
Armed with all my suppositions and imaginings I started with the interior first. I managed to come up with four sections of the walls that I could cut out to add the inside walls and the third printout was used to add the floor. To get started I folded up sections of scrap into ledges on the front and two side walls inside the Assay Office at the bottom, this would give my floor some support. Once they dried, I cut and placed the floor first then glued up the side walls and back wall about halfway back. I made up a counter and its' top from some of the cut out scraps of walls and then added a map by drawing one up and glued it on the wall behind the counter for a bit of eye candy if one chose to look in the open doors.
The two rear doors of each building got two sections of door openings glued in place before adding the cut out doors, these were left oversize to offer a bit of gluing space. With the inside work done, I glued up the sides and formed them into the required shape. Once they had dried I started adding the second exterior windows, doors, and letter bin for the Land Office. Before adding these details, I made sure to edge color the parts with either a black or brown Sharpie pen so that I wouldn't have a lot of white showing around the edges to spoil the effect. With the false fronts folded over and glued down I could add the roof panels. I did cut down both of these as they looked a little oversized to my eye. The interior of the Assay Office rood panel was treated to some color with a reddish brown Sharpie which also bled through and changed the color of the top of the roof. Both roofs got edge colored like the other parts. The color change on the Assay Office is not a bad thing as it does make the two building roofs look a little different and offers a nice contrast, some mistakes are good.
When I added the two porch roof panels, I also colored their undersides and edges before gluing. That one little touch does eliminate the white edges and undersides that detract from the finished models. Since I wanted to add some posts to the fronts of these two additions it was necessary to start to figure out how to make the base and the posts and supports. I chose to use balsa wood as I have a pretty good lumber yard of it laying about. From past experience, I chose panels of various thickness when I purchase balsa wood. It is easier to store panels rather than precut thin strips and when I need some strips, a ruler and hobby knife can offer a lot of strips in short order. 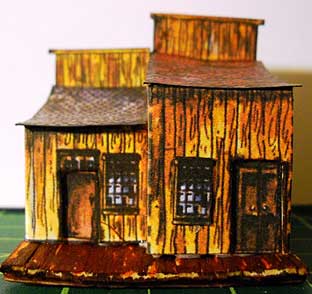
With a lot of strips cut out, I laid out a row of the strips, figured out how much room I wanted for the two buildings and laid a rule over the row at the desired mark. Slicing a bunch of strips out gave me what I needed in the same length and I just laid the entire base out at one time. I chose three sections of the balsa to act as cross pieces and laid them across the bottom. Holding down the center cross beam while applying a layer of White Glue to the whole section and spreading it out with a bit of scrap, then changing to the other side and repeating the process had the base together in less time than it takes to describe the whole thing. Once the glue had dried, I used an orange Sharpie to color stripes the length of the individual strips then used a brown Sharpie to go over the whole thing letting some of the orange show through to create a wood grain effect.
 I did the same thing to color individual strips of balsa left over for the posts and supports under the porch roof panels then cut them to size. With the builidings glued down to the base, I could measure and cut the supports and posts from my stock of ready colored strips. I did add the inward opening doors to the front of the Assay Office as well as a couple of steps leading up to the doorways of each buildng before adding all those posts, made it much easier than fighting my way past the forest of posts that would be in the way other wise.
So after a few evenings of working, here is my little Assay and Land Office combo. The base sort of warped up, but when I go to glue it down to a more permanent setting, that will get corrected. The Glue drying is most likely the cause of that problem but it is not a big deal.
Jay Massey