

English Railroad Station - $$3.00
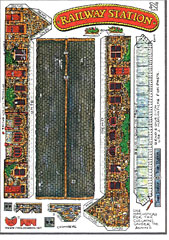
This fine Victorian Railroad Station lives in England at the popular Beamish Open Air Museum. It's included in the extensive English Buildings Collection from Fiddlersgreen Downloadables

English Railroad Station at Beamish Open Air Museum, England
This is a quite long model in N scale and shortened a bit for HO Scale.
It lives, these days, at the Beamish Open Air Museum.
It comes in three sizes Approximate HO, N, and Z scales
(Photos below)
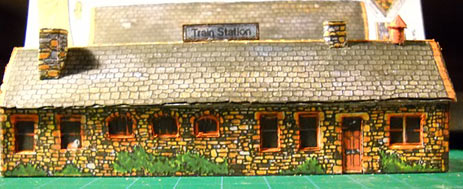
I finished building my second building today and thought I would toss a picture or two your way. It is the English Railroad Station which is quite the nice little kit to build with no vices that I could find. It went together in a short time, I chose to tinker with it and managed to stretch it out over about four days of tinkering time. I liked the additions that were laid out right on the kit page such as the recessed arch ways and adding the awning supports. I chose to make up two copies that were trimmed of doors, windows and arches to be laid over a third untouched copy to give things a bit more depth. You can really tell the depth that this affords from this picture.
I am still working at it, I am going to build a platform and add some rails and a road bed to make a complete individual set up that can be plugged into a layout. I will be building up some more pieces of "N" Scale buildings to add to this as well as other styles. When I work on them I will be adding to the Buildings Section of the forums to sort of add a little more content there. Jay Massey...June 09
Fiddlers Green Railroad Station (quite detailed) Tutorial ....By Jay
Hi All,
Having decided which one of the excellent Fiddlers Green buildings to build next, the English Railroad Station, I wanted to figure out just how to go about doing this. I visited the local hobby shop today to see just what sort of detail "store bought" N scale stuff might include. There seemed to be an either/or sort of thing going on. Either they were all plastic with molded details and texturing or a combination of printed card with some plastic added to furnish the 3 D effect here and there. Not that this is bad or anything, but I was curious to see how far the pros carried these things. It did make me think that a downloaded Fiddlers Green project with a few bits and bobs added plus some technical that modelers have used for a while would no doubt produce just as good if not better results.
I decided to start with the fiddly bits of the kit first since those would be the most difficult part of the kit. In this case they are the three smallest parts, the chimneys and stove pipe. To sort of help in my build up, I will try and show the parts as they appear on the page, cut out and finished with a bit of explanation as to how I managed to do what I did and why. So here goes.
As you can see, two of the pieces, the stove pipe and smallest chimney are designed to fit over the peak of the roof. The circular stove pipe doesn't have a tab to glue to connect the sides so I used a scrap bit of the same card inside once I had formed it by rolling a small drill bit over the inside surface of the part while resting it on an old mouse pad. The give of the mouse pad does the shaping for you for the most part. Once I had it where I could hold it in my fingers and have it stay round I put a little
White glue on the tip of a toothpick and applied it sparingly to the edges where they met. While it was still wet, I smeared a bit more glue inside on both sides where the ends met and slipped a precut and pre shaped the same way as I had shaped the part: bit of card inside to bridge on either side of the two edges. Rolling it between my fingers gently to keep the round shape going while the glue set a bit made sure that the edges did not spread out a bit. Once things had dried somewhat, I used the same drill bit and mouse pad to seal the deal by rolling the assembled part on the mouse pad some more to make it nice and round.
The conical cap was shaped on a pencil point first using the mouse pad trick again. It is necessary to orient the pencil at an angle to keep the point at the crown while you do this so you wind up with a conical shape. Once I had it shaped, I noticed that I needed to trim the top of the glue tab down just a little bit at the top so that it would form the shape I was going for. I took off about a 1/16 of an inch from the top of the tab and then glued the part together rolling it around in between my finger tips and once satisfied it would stay in that shape, I used a pair of needle pointed mini pliers to squeeze the tab and end together where they joined. I used a Sharpie Marker in a matching color to the part to edge color the top part and run down the seam line so no white edges showed through. Here is a picture of the parts, completed piece and the tools I used to form them.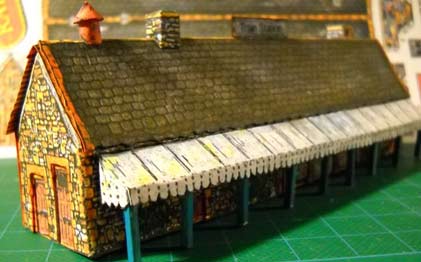
The squared off chimneys were somewhat easier to deal with. I used a pair of flat square tip mini pliers to make the right angle bends in the parts first, then bent the tabs last. As one fits the peak and the other fits to one side of it, the one that fits to the side has a pair of generous glue tabs to help it stay in place. Using the tooth pick to apply a small amount of white glue to the end tabs I formed the parts and sealed the tabs down with a squeeze from the needle nose mini pliers. While these were drying,
I turned my attention to the caps for the chimneys. Looking at the printing on the chimneys showed a row of light brown cap stones on the tops of each. The cap parts are actually oversized so you can form a lip all around to make a glue tab. Using my hobby knife to slice the edges to form the first bend lines then using the flat nosed pliers to make precise bends for them showed me where the next set of bends needed to go to form the caps into tiny tray shapes that would fit inside the tops of each chimney. Pushing them down inside the chimney forms and orienting the two printed openings to go the same direction I used my glue application toothpick as a combination tool to get them down all the way. I held the two parts upside down on the cutting mat to level the parts then added some glue from the inside to attach the parts to one another. Once dried, I used a black Sharpie to edge color the tops of each so no white card shows up at the tops. So here are the two chimneys and the tools I used to make them, aside from the toothpick.
Since I am working with card for the most part to make this kit up, to get the depth that I want to add to some of the parts, I will be using three print outs of the sheet to get the parts and pieces that I need. A small price to pay but as I go along you will be able to see what I am doing to give it a more 3 D effect and add a bit more detail overall. Bear in mind that this is not required to turn out this kit, it is just something that I like to do with them. I am basically trading time invested in the kit to arrive at something that would cost money in initial outlay at the hobby shop. I am using 110 pound card to print this out on to help make things a bit thicker as well as provide stability to the parts as I work with them. So stay tuned and watch for more.
I like these older kits, there is so much you can do with them if you take a little time and care in putting them together. I started working on the sides of the building next. I made a fourth print so I could demonstrate what I was doing in keeping with the theme I started here. The more detailed side that would be facing out on the section is the one with the arches. Looking at the sheet you can see where the directions show you to cut out the arches as well as leaving a little white strip below each to represent the depth. To get the 3D effect that I was looking for, I decided to use three complete printouts of the parts. By cutting out the doors, windows and archways on the top two I could glue all three together to make a somewhat thick but better looking side panel. I have also scored a 6 section package of "N" scale straight track and some cork track bed, the track was less than $4 and the track bed was all of $.98. Not an expensive but necessary purchase for where I am going with this little project.
You can also see at the bottom of the archway cut outs that I have saved an extra set of the posters that are on the wall at the back of the arch. The back section of the building was trimmed out the same way as the front. I do like the extra detail of the cats in the windows as well as the bushes printed on these little panels. With the panels cut out and glued together it is time to turn to the roof. For this part of the project I just used one thickness. I did pre color the underside so that it would match the colors on the top of the roof as well as run a set of lines on the ends.
The next part of the building is the awning that hangs over the front. This part has a nicely done serrated edge that could be a real trial if you tried to cut it out with a pair of scissors following the little curves in this scale. Instead I chose to cut it out following a straight line on the outside of the tips of the curved sections once I had the part free of the sheet.
Once the part was cut out, it was a simple matter to trim out the edge with a hobby knife. Once the shape of the little segments was cleaned up, I cut a slice on the black separating lines of each segment so that these are free to be manipulated a little once the awning is in place. I glued the parts together lining things up as best I could. I did have to trim one of the front panels' top corners a bit so that it would not interfere with the fit of the roof panel, it over hung the side folded panel where you make the glue joint so it was required. Other than that, parts fit was pretty good. Once I got the roof panel in place, I decided to add a second panel over the first, it made for a more realistic appearance with a row of the bottom one peeking out like a run of slates would on a real roof.
Folding the awning up and adding it was mostly getting things centered on the one side. The little chimneys and stove pipe fit nicely and glued down securely in the locations where they were supposed to go. I did use a marker to cover part of where the stove pipe went, the printed location marker showed up just a little passed where the round pipe went. The "Train Station" sign for the roof got cut into two pieces and laminated to a bit of scrap card to thicken it up a bit. I trimmed the edges with a brown Sharpie and centered it on the roof. The last items I added were a set of awning support posts. I made these from some blue colored square toothpicks I had on hand, I chose blue just to brighten things up a bit.
I am now in the process of constructing a platform for my Railroad Station at the moment. I am using the same balsa wood construction technique as I did with the Assay and Land Office. It should improve the condition of some of those awning posts, they sorta look a little snaggle toothed in retrospect. I also picked up some fresh "greenery" at the local hobby shop today so I can add yet another dimension to these little buildings. I have a few bags of older stuff in various sizes and colors, but the choice of going with "N" Scale sorta limits just how coarse you can get by with and still look proper. Jay